Hairstyle is very important for everyone. The false hair style makes the people looks old. But the right hairstyle can make you look younger and rejuvenated. The right hairstyle should work with your face shape and complement your features. Here are some advice to how to choose the hair style:
1, Oval. An oval face shape is considered to be the one shape that can wear any type of style.
2, Round. A layered top that provides fullness and height and thinned out hair below the cheekbones all work to lengthen the look of the face and give the illusion of a narrower chin line.
3, Heart shape. Go for a style that offers more fullness lower on the face and less fullness at the forehead.
4, Square. The idea here is to soften the face so wispy bangs and wavy styles help to create this effect. It's best to avoid straight lines, straight bangs and straight or flat hair for this face shape.
5, Oblong. Consider a bang, especially a side-swept bang to create the illusion of a shorter forehead for the person with this longer face shape.
If you want to have new trendy hairstyle, you can watch online videos on YouTube, some fashion websites and also you can page through the hair style magazines. And you can go to your experienced hair stylist for assistance.
Monday, August 31, 2015
Friday, August 28, 2015
Take Care of your Hair
Even the 100% virgin remy human hair, if it is dryness, oil and dirt build-up, salt water, chlorine and not combing out your hair daily, the hair extension can be tangled. Make sure washing & conditioning the hair extensions once a week, twice a week is better. Use hydrating drops or consult your stylist for more help. Follow are 5 steps to take care your hair extensions:
Shampooing & Rinse
when shampooing your cara hair, use a mild shampoo and warm water. Be careful to shampoo the hair between the palms of your hands from the ends of the hair up to the scalp. Rinse hair from the top of the head down to the ends of the hair.
Conditioning
Use a strong conditioner with cara hair, avoiding conditioners that will weigh down the hair. Detangling products and silicone serums are also safe to use with this live cuticle hair. Avoid tangling and breakage by using a wide-tooth comb on wet hair.
Drying
Wring out the wet hair as much as possible to remove excess water in the hair. Next, towel-dry the hair as much as possible. Use a blow dryer with a strong airflow and not just a hot one. Blow drying with a flat brush and applying a protective product works best when using a blow dryer for hair straightening.
Heating
Avoid using heat exceeding 280 degrees fahrenheit on the cara hair. Use a straightening iron sparingly, and avoid using heat-styling tools with straightening treatments.
Repairing
Consider ionic products for repairing damaged hair. Lonic products are negatively charged to control the positvely charged hairs that tend to split fly away or become brittle from dryness. Lonic products-such as chemical treatments and special blow dryer-restore, deodorize and return beautiful hair to a healthy state.
Friday, August 21, 2015
10 Steps Care of Human Hair Extensions
Hair care if very important for the hair extensions, even it is the 100% remy human hair. If you want its lifetime could last a long time, you must treat it like your own real hair and take a very good care for it. If the hair extension is too dry, it may be getting tangle sometimes. So make sure to wash and condition the hair extensions at least once a week, if is washed twice a week is better. Following is 10 steps to care of the human hair extensions:
One. Wash and condition hair regularly.
Two. Detangle hair gently before washing. Do not rub or twist hair
Three. Add mild shampoo to cool water and swish hair till clean. Rinse thoroughly.
Four. Blot out excess water with towel and allow hair to dry naturally. Do not expose to sun
Five. Comb curly hair gently with your fingers from the tips, then upper and upper, please don not comb your hair, especially long hair from top to end directly.. Do not brush
Six. Brush the hair in a downward motion starting at the ends and work your way up to the roots.
Seven. Certain items should not be brushed. EG braids, DOME, ETC. Consult your hair stylist if in doubt.
Eight. Hair extensions may tangle and shed if general care directions are not followed properly.
Nine. The weft is protected by glue. The hair may shed if customer wash the weft with chemical and hot water.
Ten. Please wash the hair ext first before brush, put on, flat iron, dye and bleach. Please don't use lotion and olive oil.
These are general guidance for the care of hair extensions. Beacuse of each hair product is vary, it is best for you to consult your hair stylist for specific instructions.
Tuesday, August 18, 2015
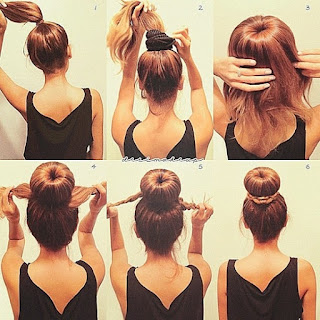
How to achieve hair buns
The hair buns are a classic and elegant style, and the best of all, they are super quick to do. Whether you are running out the door to school or trying to get ready for work, the bun hairstyles are easy, quick and simple to achieve. Following are 3 easy steps to achieve the hair buns:
1. Prep your hair. Pull your real hair into a loose ponytail, and place it into a high ponytail. Don't use a comb or worry about your strands being perfectly slicked back—the look is effortless.
2. Separate the hair in your ponytail into two or three sections and tease. Teasing is the key step that totally changed our bun game—it gives you the volume and messy texture you need to pull off the look and keeps your bun from ballerina status.
3. Separate your teased hair into two sections and wrap the hair in opposite directions, as you would when creating a topknot. But, instead of pinning your hair neatly in, secure your hair with a bobby pin about an inch from the bottom of your strands, leaving the ends to fray around your bun and create a messy effect. If you feel like the body of your bun is too tight, gently pull it apart with your hands or the end of a comb. We also like to pull a few rogue pieces out around the face.
Finished Look - That's it for the doughnut hair bun!
Thursday, August 13, 2015
How To Make A Bow With Your Own Hair
Do you love hair bow? It is realy awesome. And you can wear it anywhere. You can wear it to the beach or even to a shool dance. You will look fabulous any way.
How to make a bow with your hair? This is a cute and fun style to do with your hair witch is quick and easy to do, it may be hard at first but after some time you will be able to do it quickly. Following are steps of making a bow with the hair:
1: Prepare:
- One hair elastic
- Some hair pins
- The hair that is at least shoulder length
2: Ponytail
Put your own real human hair in a ponytail were ever you would like to put the bow.
3: Bun
Pull the middle of your ponytail through the elastic so there is only about 10cm of hair has not gone through the elastic.
4: Spreading
Take the newly made bun and spread it evenly into a have circle.
5: Split
Make a split in the middle of the half circle.
6: Middle
Pull the 10cm strand of hair over top of the split and pin it down with a hair pin.
7: Pining
Now pin the front down with a hair pin and if you want you can pin the two sides down.
Monday, August 10, 2015
Use Hair Accessories to Make Hairstyles
When you want to make a cute and unique hair style quickly, use the hair accessories is the best choice. Following are five different hair accessories show:
1, Hair ring. One or two well-chosen hair ring can really make your hairstyle stand out. Easy and quick!
2, Hair ribbons. If you're fastening your hair into a ponytail or bun, add a ribbon to the style. You can tie the ribbon over any elastics, effectively disguising them, or use the hair ribbon alone.
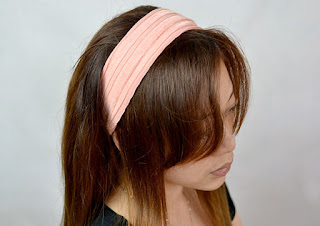
3, Use a Headband. Head bands can be elaborate or simple, and worn with loose or fastened hair. Experiment and see whether you like the head band to be close to your hair line, or farther back on the crown of your head.
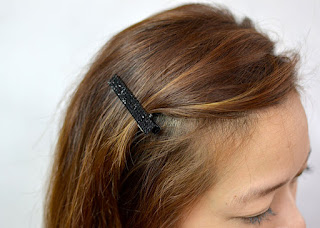
4, Use hair clips, combs or barrettes. These hair accessories can be used to fasten your hair, or simply for decoration. Make sure the colors or designs don't clash with your outfit or hair color.
5, Scarves and Head Wraps. They are so easy and good to protect your hair style. But you must not to tie them too tight.
Thursday, August 6, 2015
How to Use a Clin-in Hair wig
Wigs are awesome, but they can be hard to wear with long hair. How to put on a wig to look as natural hair and realistic as possible. Here are three easy steps to follow:
Step 1: Partition from the bottom up,with a fixed head of hair clip.
Step 2: Took it up and compare the length of the suitability of films,starting from the edge of her hair to the middle sandwiched.
Step 3: According to head size were connected to the left and right in the head.
Step 1: Partition from the bottom up,with a fixed head of hair clip.
Step 2: Took it up and compare the length of the suitability of films,starting from the edge of her hair to the middle sandwiched.
Step 3: According to head size were connected to the left and right in the head.
Tuesday, August 4, 2015
How to Store Hair wigs
The hair wig is now becoming more and more popular. Some wear the wigs for medical reasons, but many people wear wigs for the versatility of a wig. If you have your wigs collection, Follow there steps to store your wigs:
Once you remove your wig, place it on a styrofoam head. This will help keep the wigs in place. Be sure to store the wig in an open and clean area, free from heat, dust or any other environmental condition that may damage it. Put it in high places away from pets and children, if you don't want your hair wigs to be ruined by pets or the children playing it as a toy.
If you plan to store the wigs for an extended amount of time, fold it in half, ear to ear, parted in the center, and placed in it's original plastic packaging. Buy a wire rack to store the wigs. This is an alternative to the styrofoam head idea. The hair wire rack will allow for air to circulate throughout the wig and keep it smell fresh.
If you plan to travel with your wig, place your wig very carefully in a portable travel storage container. It is the best that the type of device can support and protect your wigs that it cannot be crushed as this might cause to lose its shape or style.
Subscribe to:
Comments (Atom)


